For best article visual quality, open Playing with the new HP SDN Controller – including getting started guide with Open vSwitch in GNS3 directly at NetworkGeekStuff.
So, HP has made one if its significant moves last November (2013) with the first public release of their OpenFlow based SDN VAN Controller 2.0. And because you can download it for free in 60 day trial as an ubuntu package, I wanted to create a nice environment for myself where I can play with it and some OpenFlow enabled switches effectively. This I achieved using the good old GNS3 simulator and importing VirtualBox linux hosts there, one for the SDN controller running on ubuntu system, and several small debian systems running Open vSwitch that will act as OpenFlow SDN switches.
Target solution of this GUIDE:
So lets make this article organized, first what is our target. We want to have two VirtualBox systems ready:
- Ubuntu with HP SDN Controller 2.0 installed
- Open vSwitch in OpenFlow mode running on debian (controlled by the HP SDN controller)
And we want it all inside GNS3 to be able to play in virtual environment anytime. The two cisco router are actually only simulating end PCs in this particular case, but can also be routers in a more complex SDN environment.
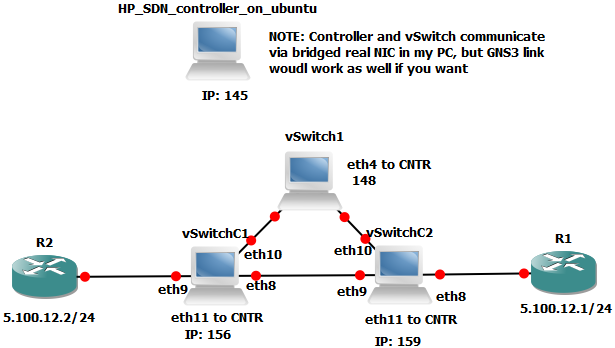
HP SDN Controller and Open vSwitch in GNS3 lab topology
Part I. Installing HP VAN SDN Controller 2.0 on ubuntu 12.04 LTS
The HP VAN SDN Ccontroller 2.0 is a new initiative from HP to create an open ecosystem for SDN networks. The controller supports some basic functions like doing L2 switching or L3 routing, but with open API (REST API) and programming interface in Java, anyone can build an application on top of this controller for any additional functionality (firewall/load-balancer/cloud interface).
![HP SDN Ecosystem]()
- HP SDN Ecosystem
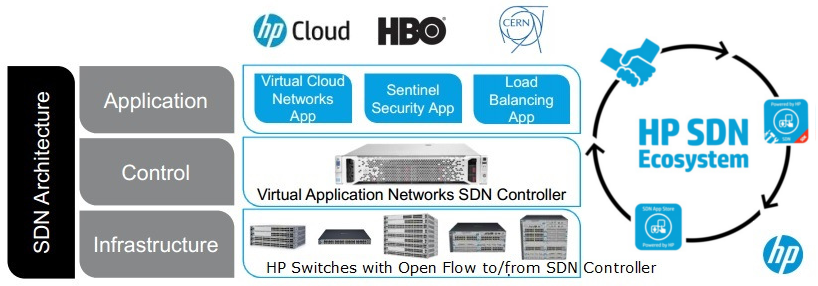
To be honest with HP there is a room for scepticism if this ecosystem gets beyound critical point to become popular. BUT at least it is an OPEN solution in sharp contrast to the currently released Cisco ACI (Application Centric Infrastructure), which is basically the SDN idea, but completelly locked to Cisco proprietary environment/protocols and only supporting the new high end Nexus 9000. So I personally would rather have an SDN network based on OpenFlow where I can replace underlining switches and controller with anything I want (even open source) instead of being locked with Cisco.
Additionally you can download this HP Controller from HP here (you will also get example Java App with the package) for installation, administration, and other documentation, here are the links:
HP VAN SDN Controller Installation Guide:
http://h20564.www2.hp.com/portal/site/hpsc/public/kb/docDisplay/?docId=c03998700
HP VAN SDN Controller License Registration and Activation Guide:
http://h20564.www2.hp.com/portal/site/hpsc/public/kb/docDisplay/?docId=c03995716
HP VAN SDN Controller Administrator Guide:
http://h20564.www2.hp.com/portal/site/hpsc/public/kb/docDisplay/?docId=c04003114
SDN Controller Programming Guide:
http://h20564.www2.hp.com/portal/site/hpsc/public/kb/docDisplay/?docId=c04003169
HP VAN SDN Controller Open Source and Third-Party Software License Agreements:
http://h20564.www2.hp.com/portal/site/hpsc/public/kb/docDisplay/?docId=c04003602
HP VAN SDN Controller REST API Guide:
http://h20564.www2.hp.com/portal/site/hpsc/public/kb/docDisplay/?docId=c04003972
Step 1 – Download HP VAN SDN Controller 2.0
First question that I will answer is why using ubuntu, it is because the HP SDN Controller is not really yet so flexibile to work without issues on other distributions. Believe me because I tried first on Debian and I spent 4 hours troubleshooting dependencies on various packages (mostly because the developers chosen most newer versions of packages even beyond testing branch). So I really recommend you simply install ubuntu 12.04 and then follow the HP SDN Controller Installation Guide (backup link) absolutely step by step.
NOTE: Including the part of using the ubuntu cloud repository and definitely use the recommended Java 7 update 25 on your computer (the one where you want to use the GUI) because other Java systems will simply not work!
Step 2 – Install the HP VAN SDN Controller 2.0
So only to summarize what you need to do from the Installation Guide:
First prepare the repository and background system:
root@hpsdncontroller:~# apt-get install python-software-properties ubuntu-cloud-keyring
root@hpsdncontroller:~# add-apt-repository “deb http://ubuntu-cloud.archive.canonical.com/ubuntu precise-updates/folsom main”
root@hpsdncontroller:~# apt-get update
root@hpsdncontroller:~# apt-get install openjdk-7-jre-headless postgresql keystone keystone-doc python-keystone iptables unzip
Then we install the HP SDN controller package itself
root@hpsdncontroller:~# dpkg -i hp-sdn-ctl_2.0.1.4254_amd64.deb
And it is best that we check the installation
root@hpsdncontroller:~# dpkg -l hp-sdn-ctl
Desired=Unknown/Install/Remove/Purge/Hold
| Status=Not/Inst/Conf-files/Unpacked/halF-conf/Half-inst/trig-aWait/Trig-pend
|/ Err?=(none)/Reinst-required (Status,Err: uppercase=bad)
||/ Name                   Version                Description
+++-======================-======================-=============================
ii  hp-sdn-ctl             2.0.0.4253             HP VAN SDN Controller
Then we can check if the service is running be either checking the process status, or we can check if there is a Java daemon on TCP 8773 port.
root@hpsdncontroller:~# service sdnc status
sdnc start/running, process 1000
root@hpsdncontroller:~# netstat -atupvn | grep 8443
tcp6       0      0 :::8443                 :::*                    LISTEN      1045/java
Step 3 – Login and license activation of the HP VAN SDN Controller 2.0
And finally, we can login to the SDN controller on https://localhost:8443/sdn/ui/ , the username is sdn and password is skyline.
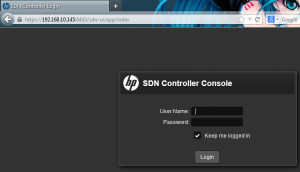
SDN Login Screen
Once you login, the basic GUI view is very simple (and quite empty at the beginning).
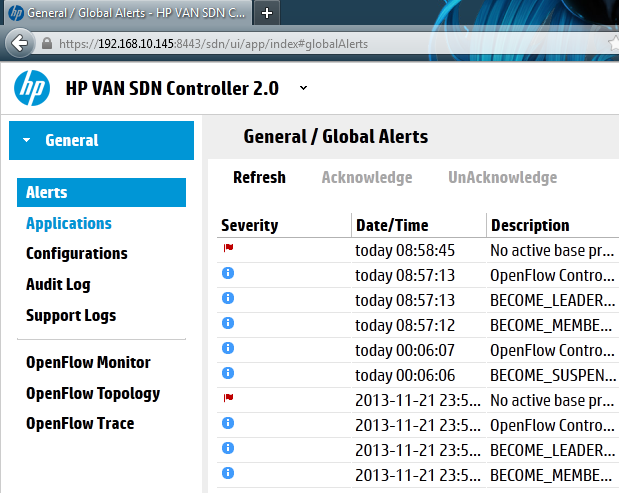
HP SDN Controller Main GUI View
The last point is getting a license for your installation,actually the best way is to go for HP VAN SDN Controller License Registration and Activation Guide.
This is the part that actually sux for me, but it was possible in summary using these commands:
First we install curl to ubuntu.
apt-get install curl
Then we ask our controller (running on 192.168.10.145 in my case) for “token”.
curl -sk -H 'Content-Type:application/json' -d '{"login":{"user":"sdn","password":"skyline","domain":"sdn"}}' https://192.168.10.145:8443/sdn/v2.0/auth
{"record":{"token":"4cd8d740fa9c4155b3c541a4c549bdf1","expiration":1385223997000,"expirationDate":"2013-11-23 17-26-37 +0100","userId":"a1759368553542bdae4bea4e7a17a5ff","userName":"sdn","domainId":"0eaae105e0b5445f912f7d698bdbb79b","domainName":"sdn"}}
With the token we ask for install ID that we need for license
curl -sk -H "X-Auth-Token:4cd8d740fa9c4155b3c541a4c549bdf1" https://192.168.10.145:8443/sdn/v2.0/licenses/installid
14751537
Now, this is the bad part guys, the licenses are pay walled :(. If I find a way how to get it free (I have it as HP employee), I will update this part.
With the install ID and token, you have to go to HP My Networking and find your order on the page visible below:
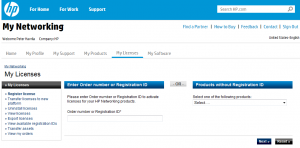
HP-Networking Order Search
REMARK: The HP SDN controller is a paid product, but for HP employees (as I am). For anyone else, there is a link on the HP SDN Controller homepage for a 60 day trial, but I haven’t tried it myself to get the license this way. So sorry that I cannot help more, by you will have to get a license yourself somehow.
From the License process, you should recieve something like this basedon you license and the install ID, here is mine:
License Key(s)
| License key: | AECBMHD2DJPQU-NJTFY7C2NBTOB-6VM4QKEQ5SOEI-DAUHQELRPGYFA |
| Registration ID: | T2HBKKX-2MBG3Y3-P6DRQMG-WQ8GKWT |
| Product number: | J9863AAE |
| Product name: | HP VAN SDN Ctrl Base SW w/ 50-node E-LTU |
| License quantity: | 1 |
| Install ID: | 14751537 |
| Status: | Active |
| Activation date: | 03-Dec-2013 |
| Expiration date: | 01-Feb-2014 |
| Friendly name: | hpsdncontroller |
| Customer notes: | HP SDN Controller for LAB purposes |
The above keys are not valid anymore as I used them, so do not try to use them 
Activating a license on the HP SDN Controller
root@hpsdncontroller:~# curl -sk -H 'Content-Type:application/json' -d '{"login":{"user":"sdn","password":"skyline","domain":"sdn"}}' https://192.168.10.145:8443/sdn/v2.0/auth
{"record":{"token":"949ec3ddae9a4afcbf4c5511c10a7c5e","expiration":1386153820000,
"expirationDate":"2013-12-04 11-43-40 +0100","userId":"a1759368553542bdae4bea4e7a17a5ff",
"userName":"sdn","domainId":"0eaae105e0b5445f912f7d698bdbb79
We take the token from Authentication, and use it for license insertion to the controller.
root@hpsdncontroller:~# curl -sk -H "X-Auth-Token:949ec3ddae9a4afcbf4c5511c10a7c5e" --data-ascii AECBMHD2DJPQU-NJTFY7C2NBTOB-6VM4QKEQ5SOEI-DAUHQELRPGYFA https://192.168.10.145:8443/sdn/v2.0/licenses
{
  "license" : {
    "install_id" : 14751537,
    "serial_no" : 26,
    "license_metric" : "Controller Node",
    "product" : "HP VAN SDN Ctrl Base",
    "metric_qty" : 50,
    "license_type" : "TRIAL",
    "base_license" : true,
    "creation_date" : "2013-12-03T11:46:26.484Z",
    "activated_date" : "2013-12-03T11:46:26.484Z",
    "expiry_date" : "2014-02-01T11:46:26.484Z",
    "license_status" : "ACTIVE"
  }
}
You can check in the controller GUI in the Audit LOG that the new license was added as visible below:

SDN License in Audit Log
Part II. Installing Open vSwitch on debian host
Here is a quick guide how to compile and install an Open vSwitch kernel module in OpenFLow mode. We will use this vSwitch daemon and install it on minimalistic debian to create for us a nice SDN switch usable in GNS3.
Step 1 – Download Open vSwitch
First, if you need more information about this great piece of software, visit the vSwitch homepage at http://openvswitch.org/. In this lab, I used vSwitch version 1.9.3 which you can download in official repositories here – openvswitch-1.9.3.tar.gz (backup link)
Step 2 – unpack, compile, install and first start
So, first lets unpack the openvswitch tar with tar -xvf ./openvswitch-1.9.3.tar.gz
tar -xvf ./openvswitch-1.9.3.tar.gz
Next, enter the directory (I recommend that you read the INSTALL files, which I admit most of this vSwitch installation is based on).
root@minidebian:~# cd vSwitch/install/openvswitch-1.9.3
root@minidebian:~/vSwitch/install/openvswitch-1.9.3# ./configure
... OMITTED ...
I have omitted the output as it is a very long and boring one, but make sure there are no errors in your execution. The configure script is technically checking if you have all the libraries and compilation tools needed in your system, if something essential will be missing, it will stop and exit wit error that you must solve to continue!
root@minidebian:~/vSwitch/install/openvswitch-1.9.3# make
... OMITTED ...
Now if you haven’t used root for the previous commands, for this last one you have to become root or used su command. The last command is make install that will move all the compiled vSwitch binaries to correct places in the system.
root@minidebian:~/vSwitch/install/openvswitch-1.9.3# make  install
... OMITTED ...
Then, create a folder for vSwitch database and initialize the database.
mkdir -p /usr/local/etc/openvswitch
ovsdb-tool create /usr/local/etc/openvswitch/conf.db vswitchd/vswitch.ovsschema
Then we can start the vSwitch database deamon that is called ovsdb-server.
/usr/local/sbin/ovsdb-server --detach --remote=punix:/usr/local/var/run/openvswitch/db.sock --remote=db:Open_vSwitch,manager_options --pidfile
Following the database start, you can start the main vSwitch daemon itself called ovs-vswitchd.
/usr/local/sbin/ovs-vswitchd --pidfile --detach
Step 3 – Local vSwitch configuration (interfaces and controller connect)
You have the vSwitch up and running now, but with empty configuration. What we need is to create a basic port configurations (add physical interfaces to be controlled by Open vSwitch in OpenFlow mode) and then tell the switch where the controller is located.
In my example, my system has 4 ethernet interfaces that I will configure this way:
eth4 – this interface will not be touched by the vSwitch and will be used by classical linux system to allow communication between the vSwitch and the controller.
eth5, eth6, eth7 – these three interfaces will be used for connecting to other GNS3 switches/routers/hosts.
This is how I will configure it, first let’s create a virtual switch called ofbr0.
root@minidebian:~# ovs-vsctl add-br ofbr0
root@minidebian:~# ovs-vsctl add-port ofbr0 eth5
root@minidebian:~# ovs-vsctl add-port ofbr0 eth6
root@minidebian:~# ovs-vsctl add-port ofbr0 eth7
root@minidebian:~# ifconfig eth5 promisc up
root@minidebian:~# ifconfig eth6 promisc up
root@minidebian:~# ifconfig eth7 promisc up
You can then check the interface status by your vSwitch with the ovs-ofctl show ofbr0 command as shown below (the ovs-ofctl is your main interface to talk with the OpenFlow vSwitch implementation).
root@minidebian:~# ovs-ofctl show ofbr0
OFPT_FEATURES_REPLY (xid=0x1): dpid:000008002723fef6
n_tables:255, n_buffers:256
capabilities: FLOW_STATS TABLE_STATS PORT_STATS QUEUE_STATS ARP_MATCH_IP
actions: OUTPUT SET_VLAN_VID SET_VLAN_PCP STRIP_VLAN SET_DL_SRC SET_DL_DST SET_NW_SRC SET_NW_DST SET_NW_TOS SET_TP_SRC SET_TP_DST ENQUEUE
 1(eth6): addr:08:00:27:bb:1d:8a
     config:     0
     state:      0
     current:    1GB-FD COPPER AUTO_NEG
     advertised: 10MB-HD 10MB-FD 100MB-HD 100MB-FD 1GB-FD COPPER AUTO_NEG
     supported:  10MB-HD 10MB-FD 100MB-HD 100MB-FD 1GB-FD COPPER AUTO_NEG
     speed: 1000 Mbps now, 1000 Mbps max
 2(eth7): addr:08:00:27:d0:44:aa
     config:     0
     state:      LINK_DOWN
     current:    COPPER AUTO_NEG
     advertised: 10MB-HD 10MB-FD 100MB-HD 100MB-FD 1GB-FD COPPER AUTO_NEG
     supported:  10MB-HD 10MB-FD 100MB-HD 100MB-FD 1GB-FD COPPER AUTO_NEG
     speed: 100 Mbps now, 1000 Mbps max
 3(eth5): addr:08:00:27:23:fe:f6
     config:     0
     state:      0
     current:    1GB-FD COPPER AUTO_NEG
     advertised: 10MB-HD 10MB-FD 100MB-HD 100MB-FD 1GB-FD COPPER AUTO_NEG
     supported:  10MB-HD 10MB-FD 100MB-HD 100MB-FD 1GB-FD COPPER AUTO_NEG
     speed: 1000 Mbps now, 1000 Mbps max
 LOCAL(ofbr0): addr:08:00:27:23:fe:f6
     config:     PORT_DOWN
     state:      LINK_DOWN
     speed: 100 Mbps now, 100 Mbps max
OFPT_GET_CONFIG_REPLY (xid=0x3): frags=normal miss_send_len=0
Other interesting commands to note for the future are:
# interface status:
ovs-ofctl show ofbr0
# show the flow table:
ovs-ofctl dump-flows ofbr0
Then you need to configure the controller IP and port where the vSwitch will try to connect and be controlled from. This is a simple ovs-vsctl set-controller ofbr0 tcp:X.X.X.X:port.
root@minidebian:~# ovs-vsctl set-controller ofbr0 tcp:192.168.10.145:6633
root@minidebian:~# ovs-vsctl get-controller ofbr0
tcp:192.168.10.145:6633
To verify that you correctly configured the controller, vSwitch ports and the communication between the controller and the vSwitch is working, go to the HP SDN controller GUI and open the OpenFlow Monitor. Inside you should see your switch registered (my vSwitch has 192.168.10.148).

vSwitch registered to HP SDN controller
You can also check the ports inside the HP SDN controller by selecting the switch and clicking on “Ports”.
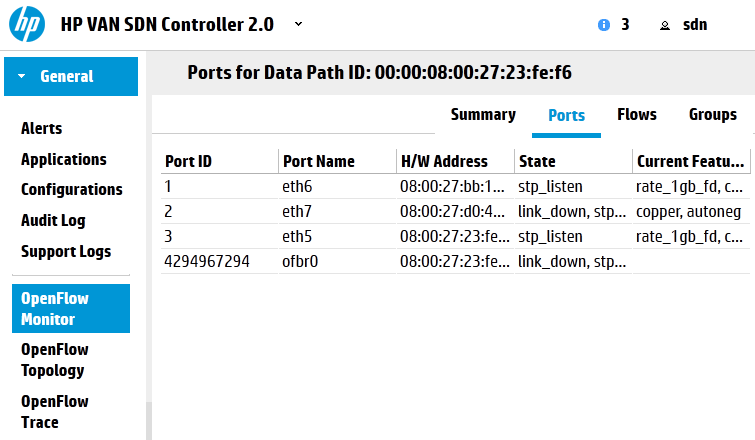
vSwitch registered to HP SDN controller – Ports
Part III. Building the topology and testing traffic forwarding
Ok, so we have both the controller and the Open vSwitch, lets put them both to GNS3 and try to interconnect them.
Step 1 – clone your virtual vSwitch system to have more switches for topology.
In VirtualBox (and also vmWare), you can clone the virtual system and create an identical copies. Do this with network MAC address re-initialization to create a unique set of interfaces in each system and create three vSwitches. Then add them to your GNS3 LAB topology via VBox API.
Step 2 – add all three vSwitch systems and the HP SDN controller system to GNS 3
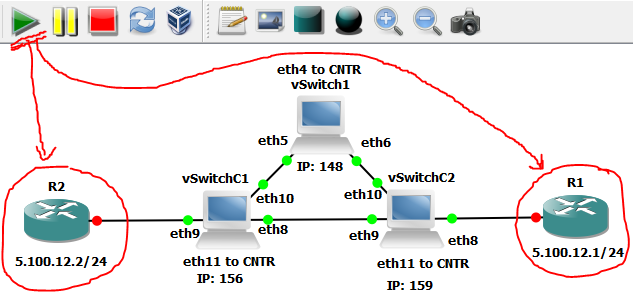
Create the GNS3 topology, you can create your own design, my image below is simply an example.
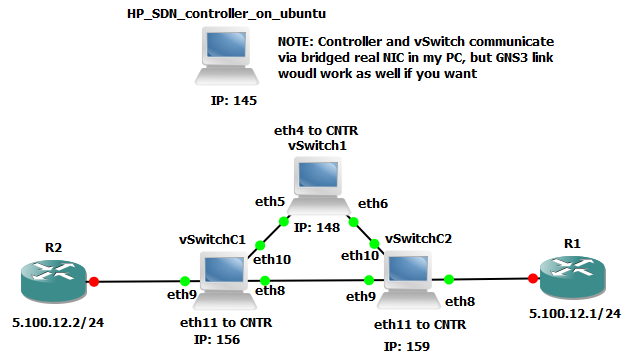
GNS3 topology with three cloned vSwitch systems
In my topology, these are the system IPs in the background:
192.168.10.145 – HP SDN controller
192.168.10.148 – vSwitch 1 (original vSwitch with eth4, eth5, eth6, eth7)
192.168.10.156 and 192.168.10.159 are the clones, with eth8, eth9, eth10 and eth11 interfaces (after re-initialization)
Configure all three vSwitches to connect to the HP SDN controller and to use the needed ports in the virtual switch instance just as I showed in Part II. Then you can check the HP SDN controller is seeing the switches.
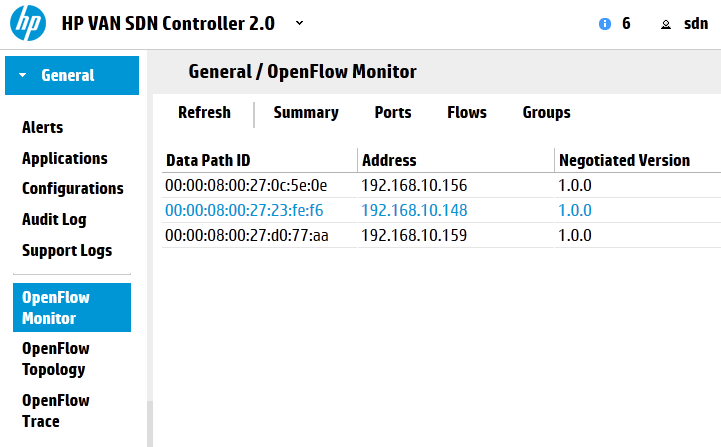
HP SDN Controller view on three switches
Step 3 – Testing the forwarding capabilities
Ok, guys, now the magic part. Have a look to the “OpenFlow Topology” view and you will notice that there is already a small map of our lab topology there.
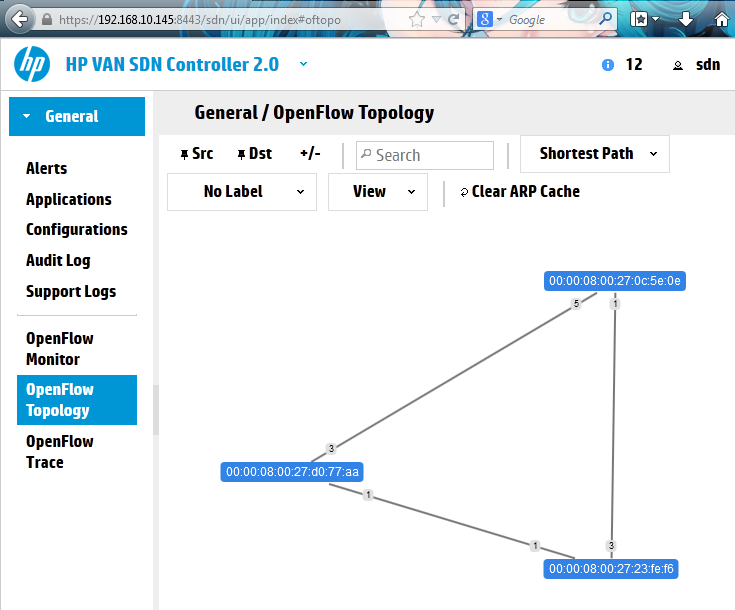
HP SDN Controller – topology view on three switches in GNS3 lab
Now, lets start the two GNS routers that simulate an end host systems:
GNS3 – start routers that simulate end hosts
Next, configure both routers with their IP addresses (inside same subnet). This is trivial and I am only showing this for completeness if this article is being red by non-network technician.

GNS3 – configure a router with IP address
Once this is done, you can again check the SDN Controller if it already registered the two hosts in the Topology view, correctly you should already see something like this:
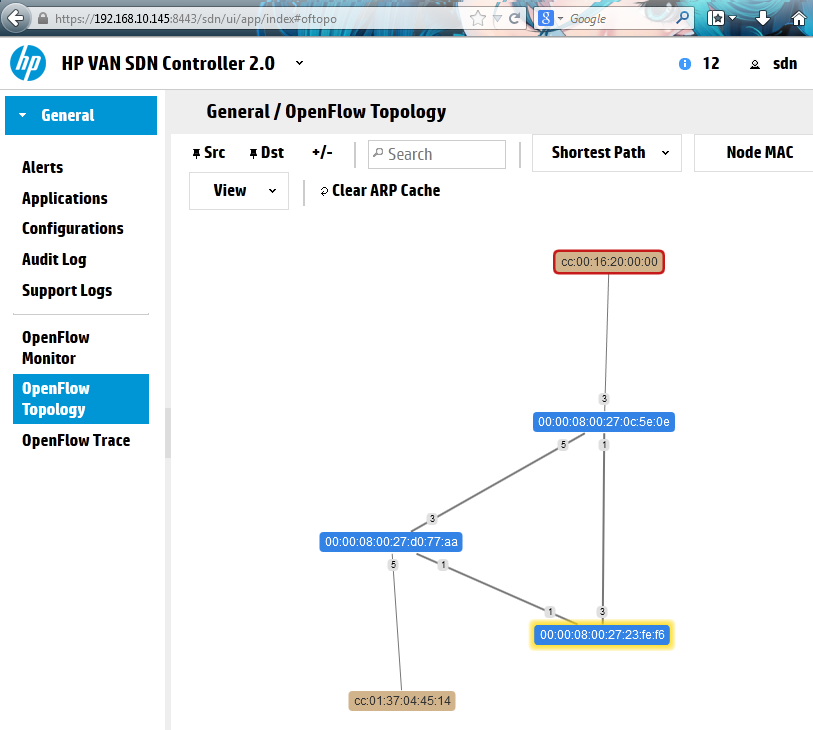
HP SDN Controller – OpenFlow Topology – three switches and two cisco routers visible as hosts
Now you should be able to nicely ping between the two routers because the HP SDN Controller would run Dijkstra algorithm to find a path through the network. So lets try the ping between our two hosts.
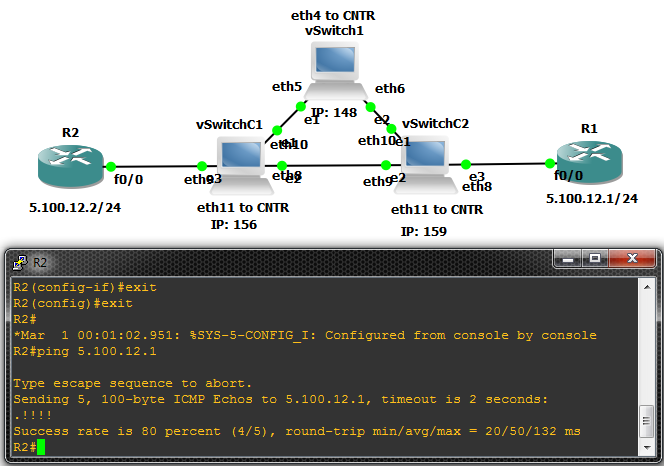
GNS3 ping between two routers in SDN topology
To see the Dijkstra algorithm path from the HP SDN Controller point of view, the Topology Overview provides a feature to switch the nodes view from mac-address to IP and to simulate the traffic path by selecting source/destination on the nodes, the results of this is visible below.

HP SDN Controller visualizing the path between two nodes in our lab topology
Lets examine the Flow Table on one of the switches, lets select the 00:00:08:00:27:0c:5e:0e (192.168.10.156) switch. You can do this inside the vSwitch console for a most extensive output:
root@minidebian:~# ovs-ofctl dump-flows ofbr0
NXST_FLOW reply (xid=0x4):
 cookie=0x2328, duration=5.364s, table=0, n_packets=5, n_bytes=570, idle_timeout=60, idle_age=5, priority=29999,ip,in_port=5,dl_src=cc:01:37:04:45:14,dl_dst=cc:00:16:20:00:00 actions=output:3
 cookie=0x2328, duration=5.3s, table=0, n_packets=4, n_bytes=456, idle_timeout=60, idle_age=5, priority=29999,ip,in_port=3,dl_src=cc:00:16:20:00:00,dl_dst=cc:01:37:04:45:14 actions=output:5
Or you can also ask the HP SDN Controller via the OpenFlow Monitor menu as shown below:
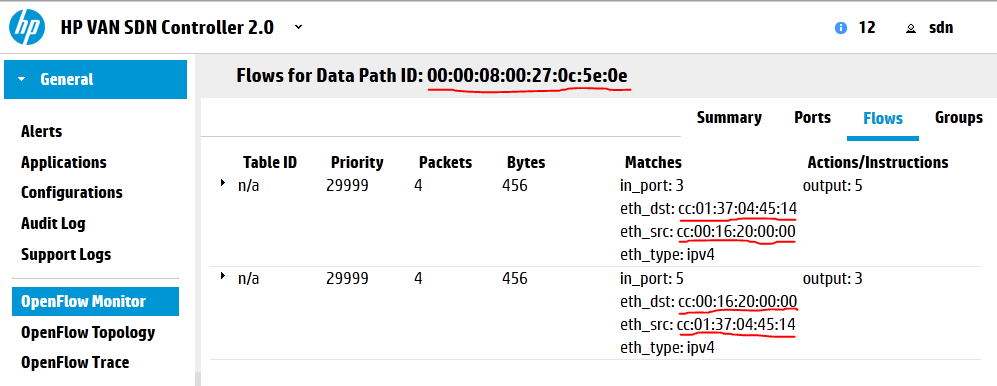
HP SDN Controller – Flow Table on vSwitch
Summary
In the very end I must say that the L2 functionality that is in the core of the release the SDN seems to work. I also played with some outages and will try to move from virtual GNS3 lab to a physical lab utilizing some HP switches that have OpenFlow support already. But the biggest lack currently with the HP SDN Controller is a simple lack of more applications on top of the controller. For example the is not even yet any L3 router, not to mention firewall or load-balancer. Hopefully this will all change when the SDN app store will be opened. There are already some partner companies developing more applications on top of the HP SDN Controller, but I haven’t seen yet any reall product that would make the HP SDN really applicable in a production environment.
Right now, this SDN from HP as vendor is only usable in lab environment and for basic L2 switching, it you want to develop your own applications you can already to so using the provided java JDK and API, but I believe 99% off all people readying this are interested in deploying SDN as a complete solution, and do not have the time/resources to develop custom SDN right now (like google did). So it is a waiting game with SDN in labs for most of us (including me), but the future for datacenters definitely looks interesting with many SDN companies trying to enter the marked.
PS: Just as a quick remark that much more is happening inside HP and the SDN/Cloud is the interesting project inside HP that is called the HP Public Cloud – www.hpcloud.com, which is actually a whole Cloud (similar to amazon or oracle cloud) on top of SDN/OpenStack, but using custom controller really. And with the new user panel called Horizon, it allows you to quickly spawn and Infrastructure as a Service (IaaS) including networks, routers, servers and currently a load-balancer in beta (firewall filtering is internal mechanism so no dedicated firewall needed). Some pictures below for inspiration how I was playing there in a free 90 days trial.
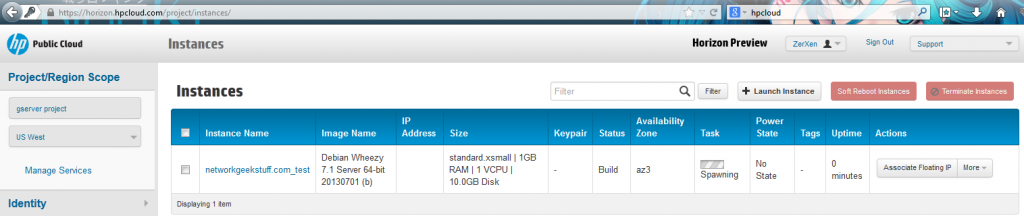
www.hpcloud.com – creating a virtual server
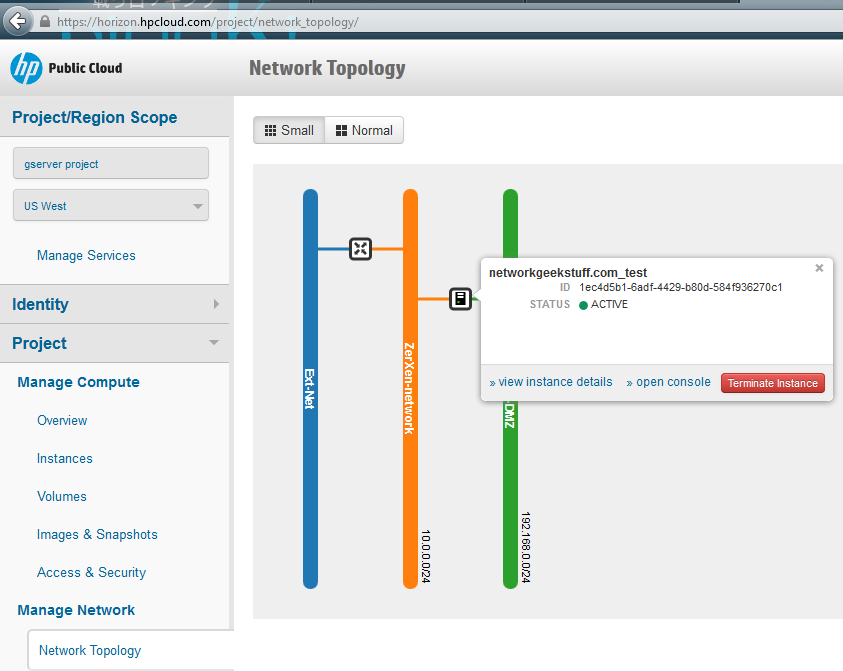
www.hpcloud.com – creating a virtual network with multiple subnets and virtual router